Cosette in ‘Les Misérables’ by Victor Hugo. The Hugo framework in Go is simple, fast, and up-to-date (and used here)
Why?
Three reasons to use PaperMod and Hugo:
- It makes producing a blog about as simple as it gets. You use markup called markdown, designed for simplicity and web output. What is markup? It’s writing **bold** to get bold. See cheatsheet.
- Edits result in instant changes locally. If using Github and hosting on Netlify, deploying updates is automatic (like the current site). The blog is fast. Hugo is a very fast framework on the very fast Go (golang) programming language, used in many cloud and web infrastructure applications.
- Finally, how could anything named for Victor Hugo not be great? (“Les misérables,” “The Hunchback of Notre-Dame”.
Installation (and assumptions)
If not running the base software (or it’s out-of-date), go to https://go.dev and https://gohugo.io to install or update. For Hugo, download and install whichever makes sense for your environment, if Mac or Linux or Windows. For me on Ubuntu Linux 18.04, I downloaded and installed as
sudo dpkg -i hugo_extended_0.97.0_Linux-64bit.deb
To confirm what is running:
    go version    // 1.18.1, the latest
    hugo version  // 0.97.0, almost the latest
Assumptions: you have experience using git, working with repos, and have accounts on Github and Netlify. Also, the examples assume Linux (or Linux environments like Darwin on the Mac, or Windows Subsystem for Linux WSL or git bash on Windows).
Create a project directory using Hugo and add the PaperMod theme as a submodule. This enables PaperMod to stay up-to-date independent of your repo.
   hugo new site <name of site> -f yml  // yml instead of toml for configuration
   // PaperMod theme uses .yml instead of .toml to write config files
   cd my_blog
   git submodule add depth=1 https://github.com/adityatelange/hugo-PaperMod.git themes/PaperMod
   # Instead of the above, if cloning your repo
   git submodule update --init --recursive
Configuration
If you really want to save time, copy the styling and layout of https://priceandposition.com. You can adapt the configuration file below (config.yml instead of .toml, see on installation above). Everything should be pretty self-evident.
PaperMod can do a lot not included here. For a complete description, see the write up by Aditya Telange, creator of PaperMod: “Installation”.
baseURL: "https://priceandposition.com"
languageCode: en-us
title: "Price and Position"
draft: false  # If true, publishes on git push; if false, "hugo server -D" to see it.
theme: "PaperMod"
paginate: 10 # was 5 by default
...

params:
  env: production # Needed to enable google analytics, opengraph, twitter-cards, etc.
  title: Price and Position
  description: "Business and tech"
  keywords: [Blog, Portfolio, PaperMod]
  author: Craig Fisk   # if multiple authors, use a list of strings:
  ...

  socialIcons:
    - name: "marmalade"
      url: "https://marmalade.ai"
    - name: linkedin
      url: "https://linkedin.com/in/craigfisk"
    - name: github
      url: "https://github.com/craigfisk"
    - name: twitter
      url: "https://twitter.com/craigfisk"
  ...
menu:
  main:
    - identifier: home
      name: home
      url: /
      weight: 5
    - identifier: posts
      name: blog
      url: /posts/
      weight: 7
      ...
    - identifier: tags
      name: tags
      url: /tags/
      weight: 20
      ...


It's configured. Let's run it locally:

```bash
    hugo server -D      // Includes any posts marked "draft: true".
    localhost:1313      // Your site; ctrl-click to open in browser.
The goal here is just to provide a basic mental model for how to work with PaperMod and Hugo, and to set up automatic updates on Netlify, so that a push to Github updates the site.
Changes
To change anything, create a replacement file in your directory tree with the same name and content as the corresponding original file in the PaperMod theme subdirectory tree, and then change (or add, or subtract) the part to modify.
Here are the relevant parts, showing the output from tree.
   tree -d  // just the directories

   .
├── archetypes  // Footers, headers, what does the default post look like, etc.
├── content
│   ├── posts   // Your posts land here, created by "hugo new posts/my_post.md"
...
├── layouts     // Any of your own changes to theme layouts go here.
│   └── partials
...
├── static
...
│   └── image   // Any images you are using. Access in blog code as "image/my_image"
└── themes
    └── PaperMod
    ...
        └── layouts
            ├── _default
            │   └── _markup
            ├── partials
            │   └── templates
    ...
Adding features
Here are some ways.
1) Using shortcodes, which are pre-defined for elements such as Figure (photo with caption), YouTube, or TOC (Table of Contents). A shortcode is a small template to add some function. “Use Hugo’s Built-in Shortcodes”. Or “Create Your Own Shortcodes”.
2) Using partials to define what goes into an element, such as a footer or header.
3) Using archetypes, which have their own directory and define the “master” version of something. For example, archetypes/post.md defines what goes into a new blog post by default.
Examples:
- To add a TOC (Table of Contents) to the homepage in https://priceandposition created by PaperMod and my configuration
layouts/partials/home_info.html
{{- with $.Site.Params.homeInfoParams }}
<article class="first-entry home-info">
  <header class="entry-header">
    <h1>{{ .Title | markdownify }}</h1>
  </header>
  <section class="entry-content">
    <p>{{ .Content | markdownify }}</p>
  </section>
  <section class="entry-content">
    <p>{{ .TableOfContents }}</p>
  </section>
  <footer class="entry-footer">
    {{ partial "social_icons.html" $.Site.Params.socialIcons }}
  </footer>
</article>
{{- end -}}
The TOC shortcode (in double squiggle brackets) has been inserted in a new section as
<section class="entry-content">
  <p>{{ .TableOfContents }}</p>
</section>
To add images (like .jpg or .png files of photos from Unsplash and Pexels), put them in static/image, and reference them in an HTML5-like figure. This can have attributes like a caption, title, alt, width, etc.
Disqus (comments) or cactus.chat and Drift (bots > “conversational marketing”)
In the homepage icons, I created and added a Marmalade icon to link to my startup at https://marmalade.ai. You could do something similar.
Netlify
Assuming you have Github and Netlify accounts, you want to set it up with your site hosted on Netlify so that anytime you push to Github your site automatically updates:
1) Login to Netlify and “Add a New Project.” If you already have a project (the case here), click to go to it. You’ll see “Site settings” and “Domain settings”.
2) Click “Domain Settings”. When finished, it will look like:
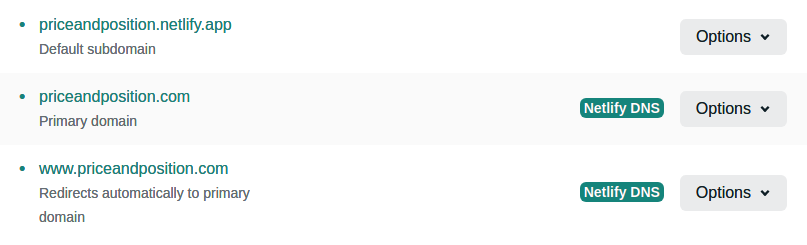
Custom Domains when complete will look like this for your domain name.
You prove ownership of the domain by accessing your account on your provider to have the domain’s nameservers point to Netlify. Go to your domain registrar (Namecheap, GoDaddy, Google Domains), then to the domain you are using (acquire it first, obviously, if necessary), and set its nameservers to point to Netlify.
For “priceandposition.com” on Namecheap, that looks like
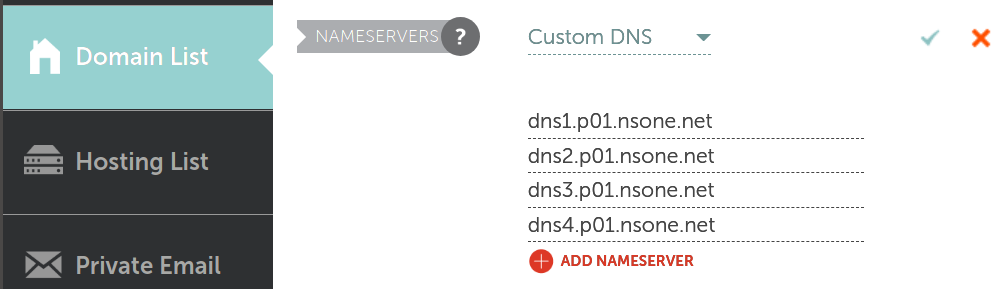
Don’t forget to click the green checkmark at top right when finished to save!
Wait. Might take 24-48 hours for the result to flow through to Netlify. There’s a button at the bottom to check whether Netlify has seen confirmation (the effect of the nameserver change on your domain host) that you own the domain. You will then have
priceandposition.netlify.com
and can edit the other two listings to refer to your actual domain.
priceandposition.com
In ancient times (10 years ago), it was unbelievably tedious to work with certificates. Now, getting https with Letsencrypt certificates is part of the deal. Netlify takes care of it. So you can use https://priceandposition.com.
While you are waiting for confirmation (might be quick; might be overnight), you may want to read Victor Hugo’s “Les misérables” - translation]/original.
3) Link to your Github account.
To get to the next step, hit the “back” button and then the Site overview button, as shown in the menu below: Click tne back button and then the Site overview button on the top level menu and then Build & deploy.
Click link to Site overview > Build & deploy.
4) Build settings.
From the “Site overview” menu, click “Build & deploy.” Notice that at the top right it says
Settings for Continuous Deployment from a Git repository
Yay! That’s what we want.
There are several things to configure on this page.
a) At the top as shown here, set your repo url on Github.
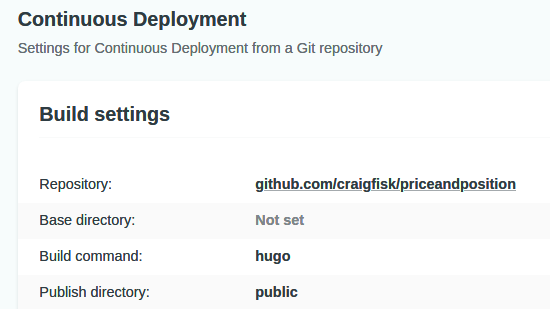
Set your repository, build command, and publish directory.
b) The build command should be hugo and the publish directory should be public.
c) Below, in the Branches section, set it to main and to deploy only the production branch.
d) Further down, under Environment Variable set key/value pairs as
    HUGO_ENV      production
    HUGO_VERSION  0.97.0  // or whatever "hugo version" returns on localhost
5) Try it out from your development system!
    hugo        // build the site
    git add .   // assuming you are already running a git project
    git commit -m 'Update for deployment'
    git push [origin main]
    // In maybe 10 seconds, the website on Netlify is updated
You’ll still see typos and things to improve, but updates are so much faster and effortless. The hugo commands are so fast it seems like nothing happened.